Learn how Data is used in a project, how you import it, export it and display it in your Document Templates.
Data tables are the way MergeOS stores the data that is used to generate documents. Data tables are similar to Excel worksheets in that they have rows and columns. Each column has a name which you can use to reference the data from that column in your Document template. email notifications, file names etc. Throughout the system you will also see column names called Variables.
A quick overview of Data Tables
When a project is running (i.e. it has been started from the project listing page) MergeOS will begin looking for new rows in that projects data table that have not been processed by the current project*. When it finds a new row, it begins the process of generating the document. First, if the project has a Pre-process step enabled and configured, the columns from the current row will be merged into that spreadsheet. Then, the columns will be merged into the Document Template and the final documents will be generated. On the way, the columns may be used in dynamically naming the files that are being generated. Lastly, if a notification has been configured and enabled, the columns will be merged into the body, subject and recipient fields of the email.
* Did you know? A Data Table can be used by more than one project, allowing you to create different documents based on the same data. Each project keeps a record of the rows it has generated so that it doesn't process a row more than once (unless you generate a row again manually).
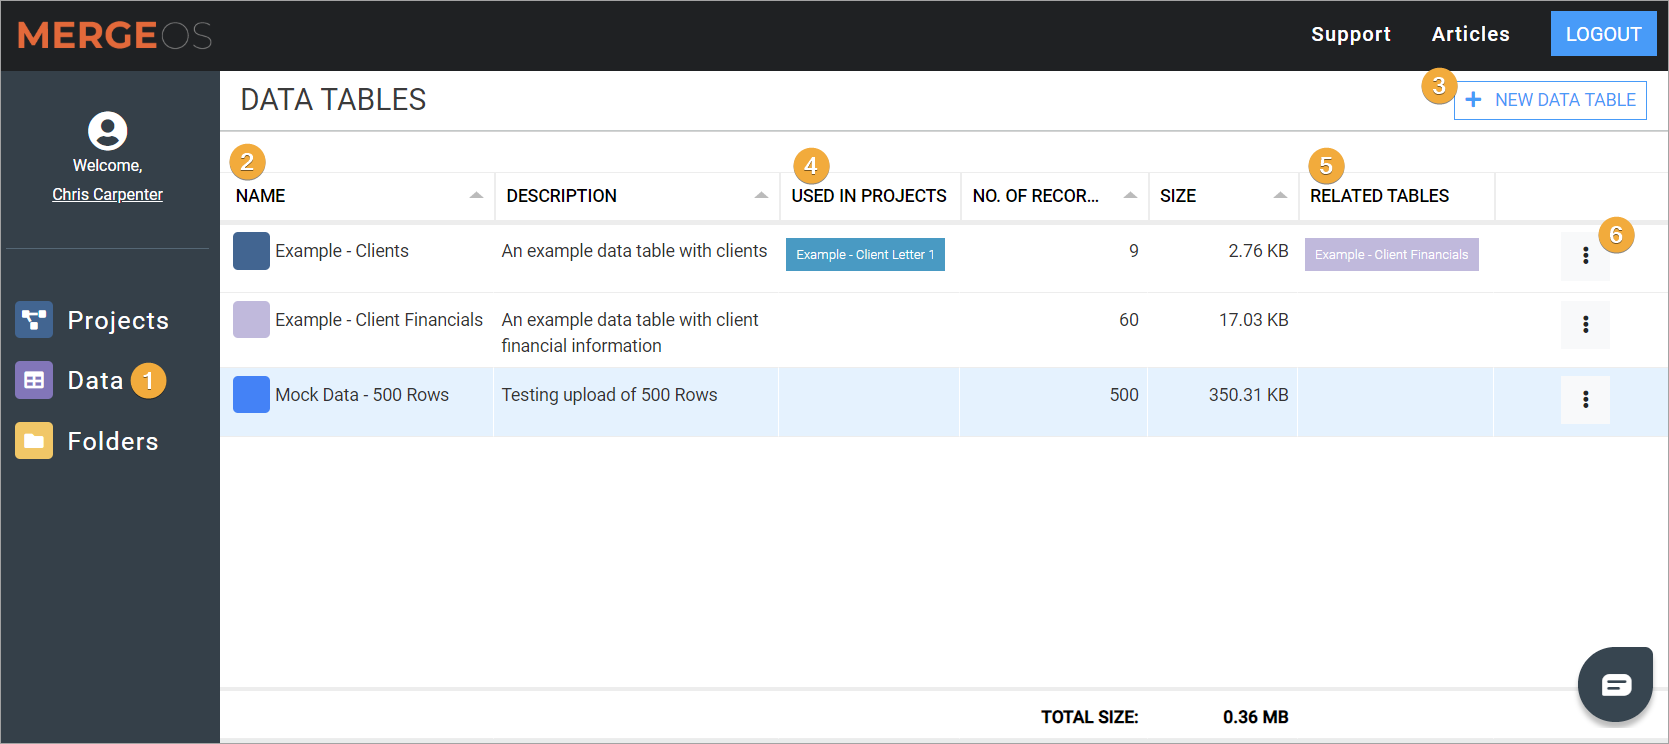
Data Table Listing
Data Table Listing
Click Data in the left menu to see all the data tables you have access to.
Each data table will be listed on the page, showing its name, description and other values
Click New Data Table to create a new data table
The Used in Projects column shows which projects are currently using the Data Table
The Related Tables column shows if any other data tables are related to this one.
Click on the action icon to Edit, Rename, Upload data, Download data, Delete all rows or delete the data table
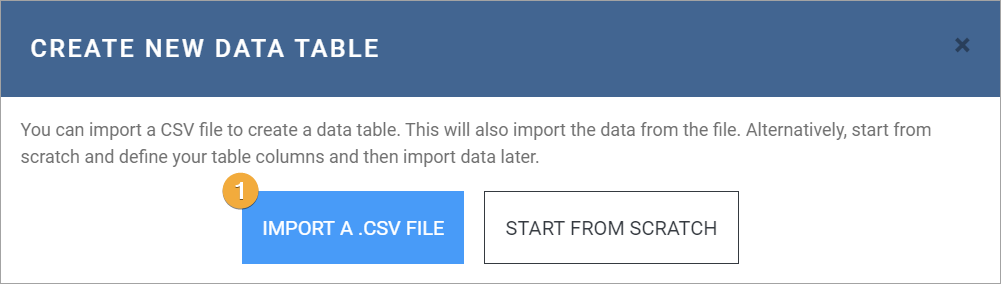
Creating a Data Table
There are two places where new Data tables can be created: from the Project Listing page when creating a new project or from the Data page, which we will cover in this section. Create New Data Table
Click on the New Data Table button to open the data table creation form. On this form you have 2 options to create a new data table - using a CSV upload or from scratch. We'll cover both in their own section below.
Importing a CSV File
Importing a CSV file
Choose Import a .CSV File to upload a CSV from your computer. This creates a new data table using the CSV heading row for column names and subsequent rows as data.
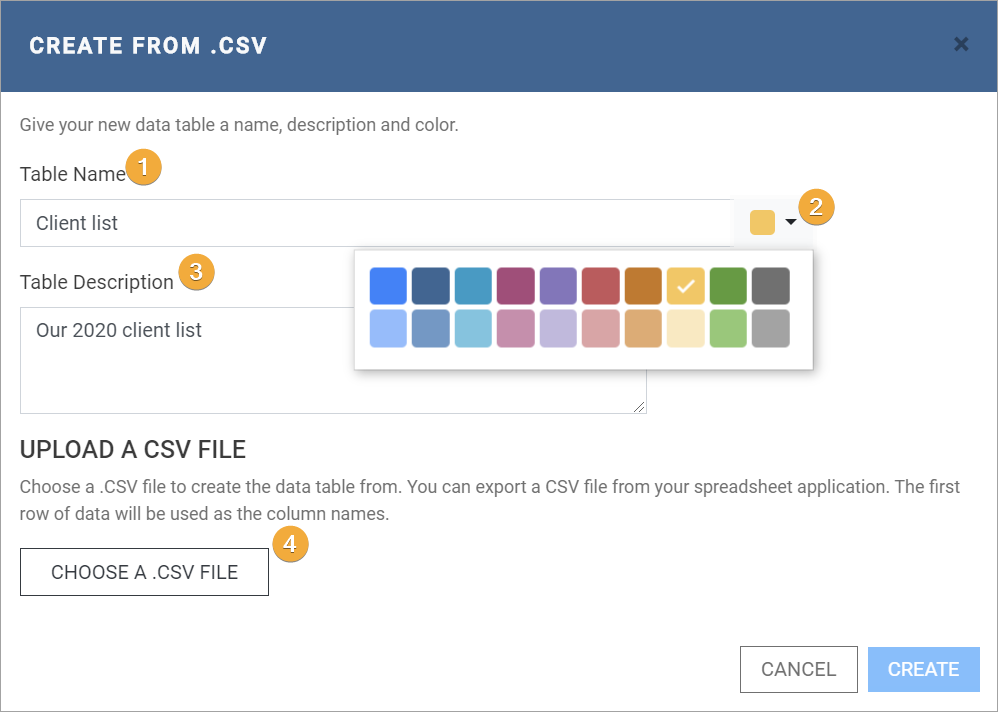
Name and describe the new data table
Enter a Name
Choose a color to differentiate the data table
Enter a Description for the data table
Upload a CSV file from your computer
After clicking the Create button, the CSV file will be uploaded and you will be taken to the Data Table edit page. This page is covered in the Data Table Editing section below.
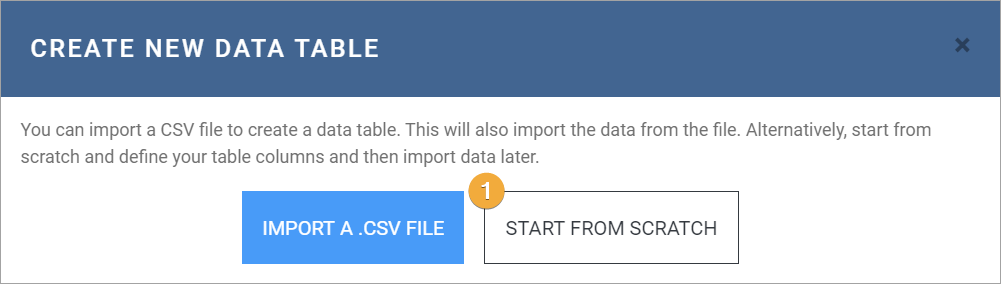
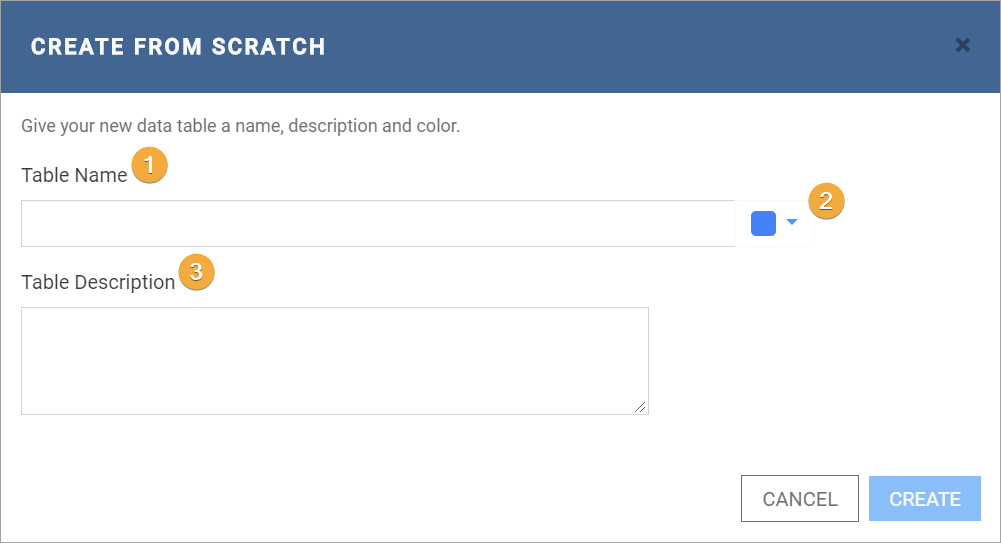
Starting From Scratch
Starting a Data Table from scratch
Choose Start From Scratch to create a new, clean Data Table
Name and describe the new Data Table
Enter a Name
Choose a color to differentiate the data table
Enter a Description for the data table
After clicking the Create button, you will be taken to the Data Table edit page.
Editing a Data Table
Whether you created a new Data Table from a CSV file or from scratch, you will always be taken to this page after creation. The Data Table editing page displays the columns and data in your Data Table. From this page you can add or remove columns, download/upload the data, add relationships and more. We will cover all of these features below.
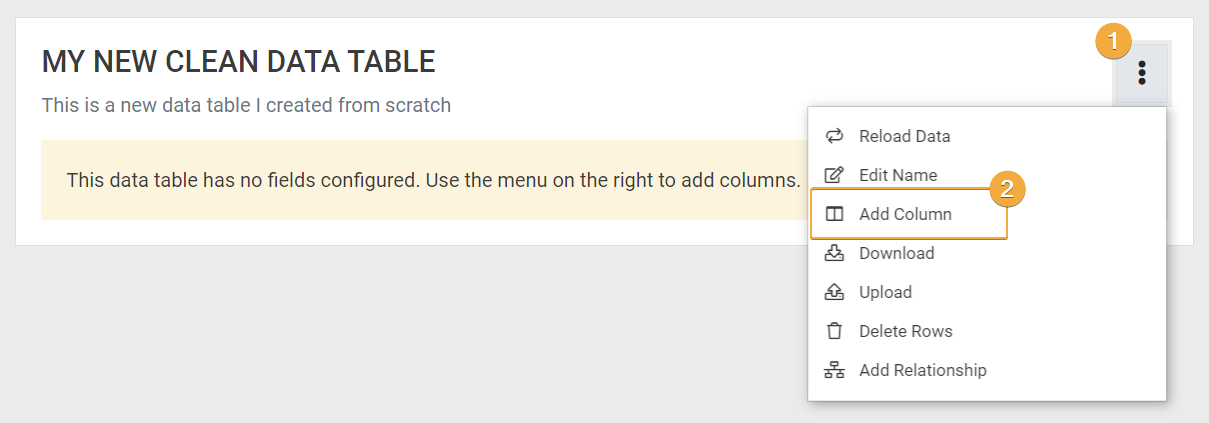
Adding a new column
If you created a new Data Table from a CSV file, you should already have some columns. If you created it from scratch, your data table will be empty of columns with a message displaying asking you to add some columns.
Adding a column to a Data Table
Click on the action icon to open the menu
Click on the Add Column menu item
Name and define the column type
Enter a Name for the new column
Choose a Type for the new column
About Column Types
Column types do not limit the type of data you can add to a column, but are more just a hint to our system about what type of data to expect. For example, we don't stop you putting Plain Text in a Number field, however if you tried to run the Round function on a word, you would get an error in your document.
In an a future release, Column Types will be used to validate the data you add to a Data Table and provide warnings when invalid data is found. At the moment, the following Column types are used by the system to offer some special features:
Email Address
You can use these columns in the To, CC and BCC fields of email notifications.
Number
Allows you to place conditional sections in documents based on two numbers. For example, you could show a section of a document if one number is greater than another.
Date
Allows the use of conditional sections in Document Templates based on two dates. For example, you could show a section of a document if one date is less than another date.
Allows the use of the Date Format function in Document Templates.
For the best compatibility, Dates should be formatted using the ISO date standard (e.g. YYYY-MM-DDTHH:MM:SS+timezone offset or for a proper date: 2020-04-19T00:01:25+00:00)
True/False
Allows you to place conditional sections in Document Templates based on the columns value. For example, you could show a section of a document if the column equals "True"
Automatic Conversion When uploading a CSV file to create a Data Table, MergeOS will attempt to automatically set the correct Column Type based on the data in that column.
Data Table Relationships
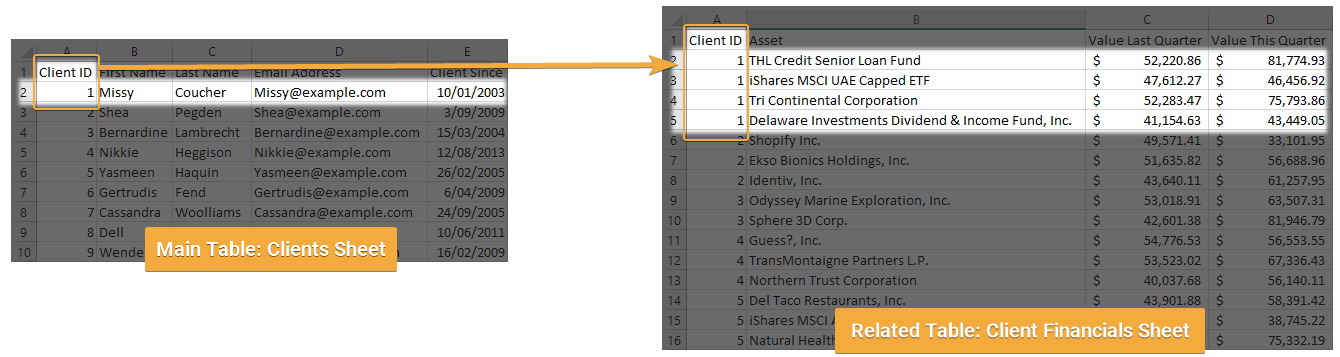
Two Data Tables can be linked together by adding a Relationship. You relate two tables by choosing a column in each that joins them together, for example, an email address or a unique ID. Doing this essentially says to the system that all the rows in the related table belong to the row in the main table.
The example below is using an Excel workbook with two sheets to illustrate the concept. The sheet on the left has a list of clients, each with a unique ID, the one on the right contains a list of investments that each client has.
Related Data
Setting this relationship up in MergeOS allows you to access the related table in a project which is using the main data table.
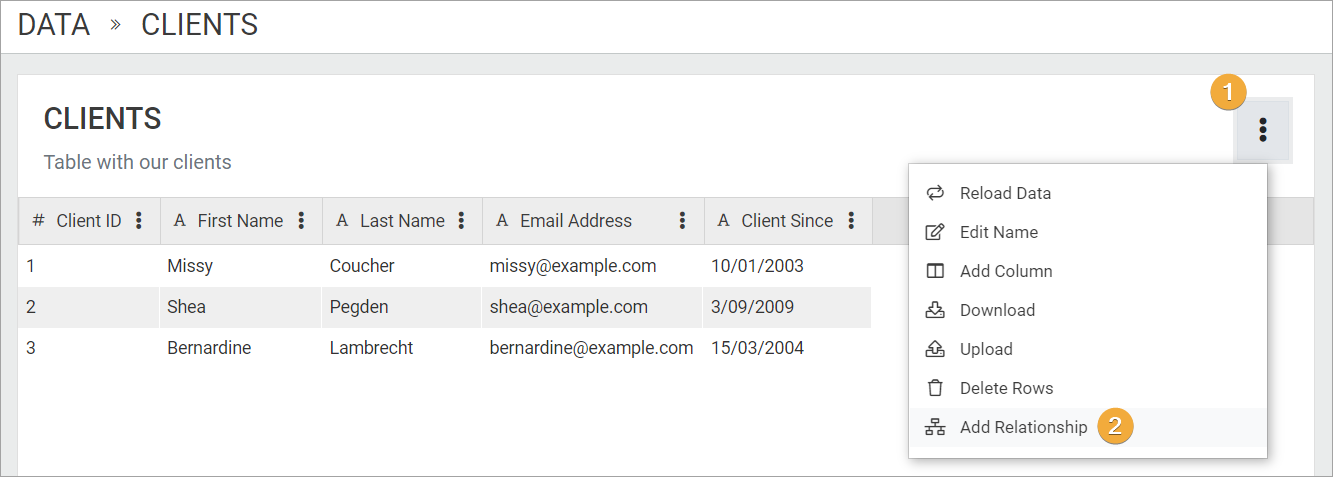
Adding a Relationship to a Data Table
Add a relationship to a data table
Click the action menu button from within the main data table. This is the data table you want to generate documents from.
Click on the Add Relationship menu item to open the Add Relationship dialog
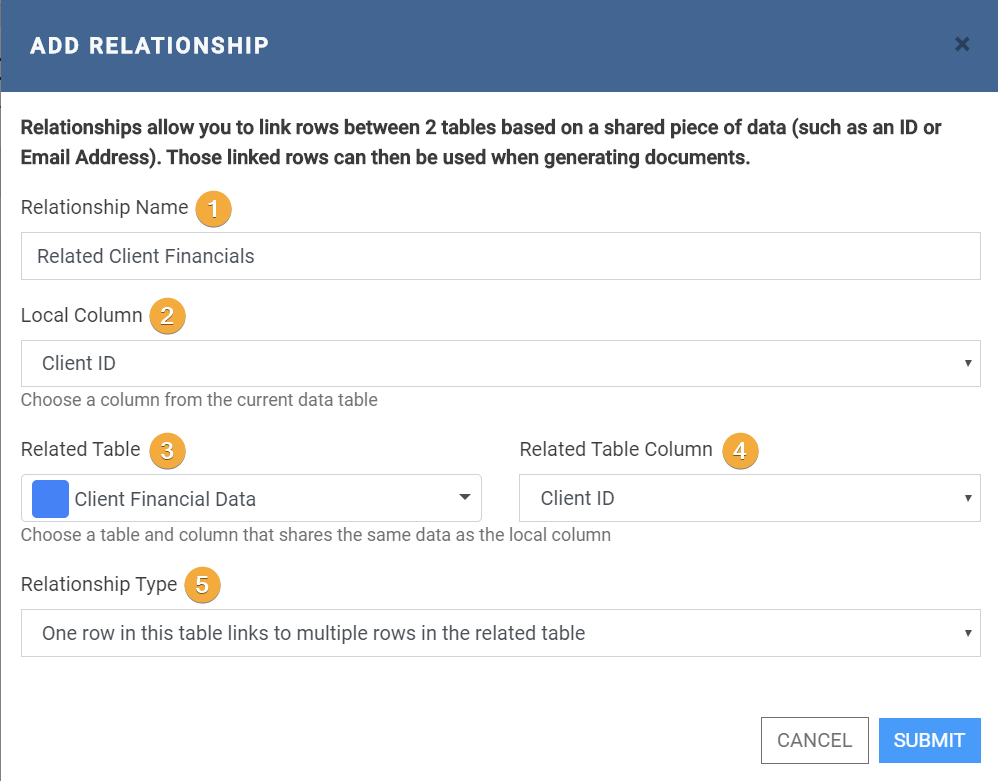
Add Relationship Dialog
Enter a Name for the relationship. This is used in other parts of the interface when you need to choose the relationship
Choose the Local Column. This should be a column that contains a unique value that identifies the row, such as an ID or Email Address or other unique value.
Select the Related Table. This is the data table that has the records you want to relate to the current data table.
Choose the Related Table Column. This is the column that relates to the Local Column. It should have the same data as the local column (note: it doesn't need the same name, just the same data), i.e. an ID or Email Address
Choose the Relationship Type. For now, only choose One row in this table links to multiple rows in the related table. This is called a One-to-Many relationship.
After clicking submit, the relationship will be created and you can now reference the related table within any projects that use the main data table.